
Preparation
A proper plan of content and process of your video is essential. In most assignments a process report is required and contains the goal, audience, a synopsis, a script or storyboard, all legal requirements of your video and references. A template for process report can be downloaded here.
Storytelling: The most important aim of your video is getting your message across. When you have completed your story(board) and script, it is advised to review and check whether your story comes across clearly and contains all elements needed.
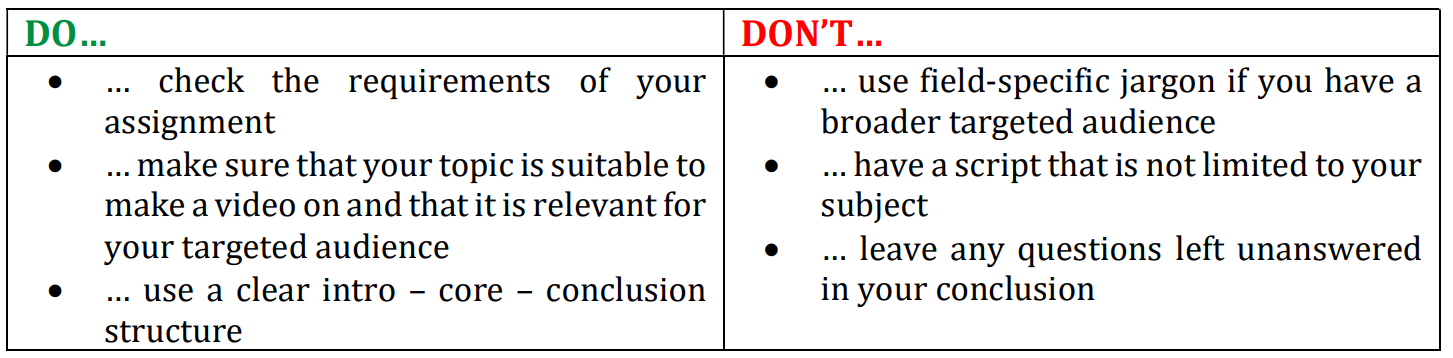
First, carefully check the requirements of the assignment, such as a predetermined target audience or specific course instructions. Second, you will have to determine the message you would like to convey. Lastly, you will have to decide on the story that is going to convey this message.
Make sure that your topic is relevant to your targeted audience. When writing a scientific paper your audience consists mostly out of other researchers in your field of study. However, with your video this might not be the case, as it can be for a broader audience. Therefore, it is essential that you know what your audience will be. If your intended audience is not familiar with field-specific jargon, make sure to introduce all concepts and explain field-specific knowledge. Be clear and concise with what you would like to say and do not go too far off-topic.
Next, decide on the video style and work on a clear introduction – core – conclusion structure in your video. In the introduction you gain the interest of your audience and state what your video is about. In the core of your video, you give all the information needed. Finally, in your conclusion you recap everything, and it is important that you answer any questions that are left in your video.
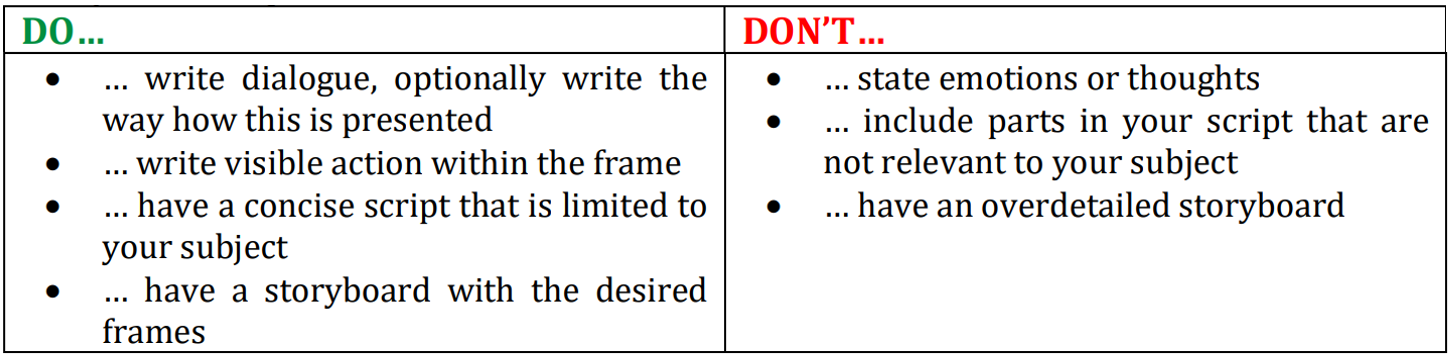
After you have come up with a plot for your video, it is time to make a script. In a script dialogue and action are written down. It describes what the viewer will see and hear in the video, but does not state emotions and thoughts of characters, as this is not something that is visible. Dialogue refers to what the characters on screen are saying. You can also state how the dialogue is presented, for example, character one shouts “hello!”. Action describes everything that will move within the frame, for example “character 1 walks towards the door” or “a tear rolls down the character’s cheek”. The second example is the only way to state emotion within a script. Be sure that your script serves the message you want to get across and that it is limited to your subject. After completing your script check if it delivers the expected intro – core – conclusion that you came up with before.
The purpose of a storyboard is to get a general visual overview and it is somewhat like a comic. It builds upon your script by adding the frames that you are going to use for your video and is a great way to share your conceptual idea of the video. You can draw this scene by scene to get a clear overview of what your video is going to be like, you can also add specific props if you want. A storyboard template can be found at the end of this document.
Technical: To make your video pleasant to watch, it is necessary to keep the following ‘rules of thumb’ in mind:
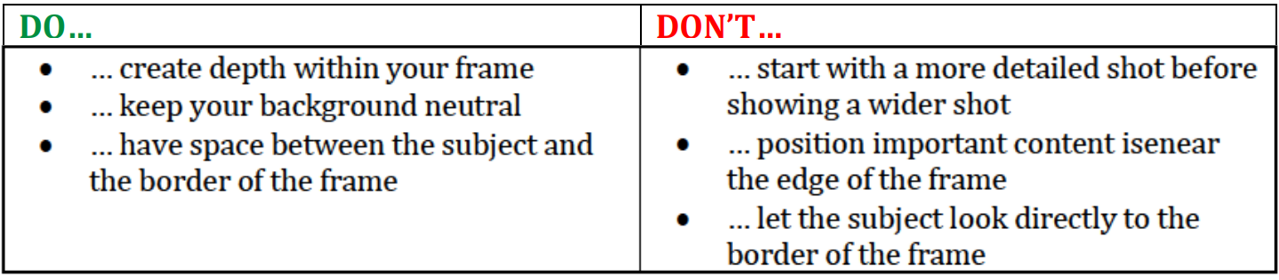
Always try to have some sort of depth within your frame. You can achieve this by choosing the right composition, for example by placing objects in the foreground of your shot. This will make it more pleasing to watch your video. Also always try to keep your background as neutral as possible as it otherwise might distract the viewer from the content.
When framing your shot, there are multiple frames you could choose from. Below the most common frames will be briefly elaborated. For a more elaborate overview of all possible camera shots, including examples, please refer to the website of studiobinder. Always start with a wider shot before going into more detail.
A wide shot consists of your subject completely in frame, but not filling it. There should be significant space above and below your subject. This shot is usually used to give a better idea of the surroundings.
A medium shot is the most commonly used and frames from roughly the waist up. This emphasises the subject more.
A close-up is used when you want to emphasise a person or an object. In the close-up shot your subject fills the entire frame.
While framing, check if your subject is not to close to the edge of the frame, since the video may be cropped when viewing on different screens or platforms. Also, make sure that the person does not look directly to the border of the frame, but that there is space between the subject’s face and the border of the frame.
Movement in your video can make it more engaging. However, too much movement is distracting, so try to strike a balance. In general, there are three types of movement. The first movement is when you turn the camera horizontally from one side to the other, called a pan. The second movement is similar to the pan but vertically, so from the top down, called a tilt. When you move the camera as a whole in a vertical axis, it is called a lift up or down. The third movement is zooming in or out. Whatever movement you choose, try to keep it as smooth as possible. Shaky video can cause motion sickness for some viewers.
During movement or changing frames, always keep the axis in mind. When, for example, you are recording a conversation between two people you can draw an imaginary line between the two subjects. Movements or frame changes should not cross this line as it is confusing for the viewer and makes it unpleasant to watch.

Continuity is quite simple and can be divided in two aspects. First, when switching between frames of the same person make sure that there is a noticeable difference between the two frames. A difference that is too small, called a jump cut, looks wrong and is often interpreted by the viewer as a mistake made by the creators or as a stutter in the video. Second, when filming, take into account the surroundings of the frame. For example, when filming outside make sure the weather does not change between scenes, e.g. if in the first frame there is bright sunshine, it should not be raining in the second frame. When filming inside this also relates to furniture that moves or tv screens that show different shows during different frames. Also take into account personal appearances and clothes.

A visit to your location before your recording day will help you choose the right scenery, which you could take into account when making your storyboard. Check if the location is not too noisy and that it fits the topic of your video. Furthermore, always check on location if everything in your frame is copyright-free. Most art pieces or something that is displayed on a computer screen can be copyrighted. An out-of-focus art piece or computer screen is not an issue. Finally, if filming on location, make sure that it is suitable for filming and that this is allowed, as stated before.

